Friday, 12 December 2014

Emily's Quilt Finished!

I finished this quilt a couple of weeks ago but, being a Christmas present for a gorgeous little girl, had to wait until I'd given it until I could share it.  So here it is: Emily's Quilt!


I wanted this to be a definitely girly quilt, but not too pink and fluffy.  The recipient is only fifteen months old, so who knows what colours she will like!  The ladies at my local fabric shop, Coles, were very helpful (and patient!) pulling bolts of fabric out to help me find the right background fabric to go with the selection of fat quarters I'd pulled from the racks.  In the end I went for a dashwood studios cream polkadot fabric for the background, which brought the mixture of accent fabrics together well.


My plan was to keep the design for this quilt fairly simple.  I used six patterned fat quarters, and 1.5m of the cream polkadot background fabric, cutting them into 6.5 inch squares (to be 6 inches finished), and laying them out alternately in a 9x11 grid.


For five of the squares towards the bottom left, I replaced the simple square blocks with Emily's name.  This was my first attempt at piecing letters - I spent a long while figuring out how to do it, and I'm so pleased with the result.  It's now inspired me to try making a whole alphabet quilt, I just need to find the right fabric...


I pieced the backing from some big flowery fabric from my stash (I love it!), and quilted it with orange peel quilting in the same way I quilted my wall hanging.  I finished it off by binding in a deep purple fabric.  The finished quilt is around 54" x 66", a nice size for snuggling.

Linking up to Crazymomquilts, and Confessions of a Fabric Addict.


Wednesday, 10 December 2014

Around the House 5 - HST quilt

I've never named my quilts, but this one probably does deserve a slightly better title than "HST quilt".  It could be "my favourite quilt ever", or "I just love this quilt", because I do.  Before I made this quilt I had used half-square triangles not very successfully on a couple of cushions, but for this quilt I took my time, trimmed all the squares, and was over the moon with how it came out.


I bought the fabric in this quilt just because I loved it.  I had kept popping in and out of the shop over a couple of weeks, trying to justify to myself why I could buy it or what I could make with it.  In the end, I just bought half a metre of each of the patterned fabrics and then started to muse on quilt designs.

The finished quilt looks absolutely nothing like my first idea.

My first idea was to make a sort of pixellated explosion starting in a bottom corner of the quilt, and moving diagonally across it.  I don't think I've explained it very well and I'm not sure I can describe it better - I will just have to actually make that design at some point and show you!


However, on musing over the fabric, I started to feel that half-square triangles were the way to go.  I bought some of my favourite patterned white background fabric - you can just about see the swirly flower pattern in the picture below (I absolutely adore this fabric, but the price prohibits me using it in more quilts), and started making the blocks.  I cut 6.5" squares to start with, and the finished blocks are 5.5".  I like to cut my squares a bit bigger than necessary for these so that if my seam allowances are slightly dodgy I can still trim them nicely to the right size.  Once I'd made a good pile, I began playing with a layout on the floor, and finally settled on this diamond pattern.


When it was finished, I hand quilted it about a centimetre on each side of each seam.  It took ages, but I was off work waiting for my baby to arrive, so had nothing else to do but whale around the house, watch daytime TV and handstitch this quilt.  I do really enjoy hand quilting - there is something very therapeutic about taking so much time over something.  You can't rush it, you just have to be there, and really enjoy the process.  It's quite an antidote to machine quilting where I sometimes feel under pressure to get it finished as soon as possible.


I backed it in a dark blue fabric spliced with a strip of the flea market fancy pink spots.  Because of the off-white thread I used for quilting, you can see the quilting design really clearly on the back which I love.


I bound it in some more of the pink spotty fabric - it's quite a wide binding, done at the time because I didn't know how to do a nice narrow binding, but actually I think the small white border and wide binding really frame the quilt nicely.


This is definitely one of my favourite curling up in front of the TV quilts, it makes me smile every time I look at it!

Monday, 8 December 2014

WIP - Black and White Cushions!

I'm excited, this is my very first commissioned project.

My husband's colleague wants some black and white cushions for her lounge.  It's a fun one because black and white isn't a colour scheme that I'd ever have chosen for myself, so it really is something a bit different to play with.  Cushions are fun anyway, because they are finished so quickly in comparison to quilts, and are a great chance to try out new designs before embarking on a whole quilt.

Taking a leaf from my Wren and Friends cushions, I bought a charm pack in Shades of Black and White by Moda and a metre of moda bleached white fabric, and started planning.  I'm aiming to do three cushions, and got the pieces cut out at lunch time today.


And as the clothes ironing got done yesterday, sewing can start tonight!

Linking up to WIP Wednesday at Freshly Pieced.

Friday, 5 December 2014

Jack Attack quilt top finished!

Whew! I think that this is the most mentally intensive quilt top I've made to date.  Normally I can can just relax whilst patchworking, watch a bit of TV, and have a generally chilled evening.  Not so here - this one required a lot of focus and, yes, one trip back to the (online) fabric store to rebuy when I cut a couple of my diagonals the wrong way round.

But, it's done!

The pattern for the union jack part of this quilt top was a quiltalong over at Lily's quilts a couple of years ago, but I've just got around to my version.  It's a present for some very special friends who have just emigrated from the UK to Canada, so I hope they like their union-flag-and-maple-leaf quilt :) I was hoping to be able to post it to them in time for Christmas but I don't think I'll have it basted and quilted by the last posting day to Canada (Monday!), so it'll have to be slightly belated.


The patterned fabric is Emily Herrick's Rustique, bought from both eclectic maker and plush addict, with Moda Bella Solids in bleached white for the background.  But oh my, I don't think I can say enough good things about Rustique.  The colours are deep and gorgeous, and perfect for this project - I wanted to nod towards the red, white and blue of the union flag but felt that to actually use those colours rigidly would make a very stark quilt.  The quality of the fabric is beautiful - it has a really solid feel but is gorgeously soft.


I ummed and ahhed for a while over how to do the maple leaves.  My initial thought was to do fusible applique, but I wasn't keen on the idea of having raw edges.  However, as soon as I stumbled across this tutorial at Crazy Old Ladies Quilts I was sold.  Granted, it was a bit more fiddly to do maple leaves than petals, and you can see in the photo below that there are a few creases, but overall I'm really pleased with how they turned out.  Currently they are just ironed on, but I'm going to sew round the edges while I'm quilting it.


Oh so pretty! I can't wait until this is quilted and winging it's way to Canada.  Happy Christmas to my lovely friends across the ocean!


Linking up to Crazymomquilts for finish it up Friday, Confessions of a fabric addict and Richard and Tanya Quilts.

Wednesday, 3 December 2014

Around the House 4 - Wren and Friends Cushions

I previously talked about my charm pack trial, having a go to see what it was possible to make with these packs of pre-cut squares.  For anyone who hasn't heard of them, a charm pack is a pack of usually about 42 x 5 inch squares, in a range of fabrics from the same fabric line (so they should go together well).  They are a good way to get a taster of a fabric line, and for around £10 a pop aren't too pricey either.

I posted before about the wall hanging I made with a PB & J by Basic Grey for Moda charm pack.  I also bought a wren and friends by Gina Martin for Moda charm pack.  I love the vibrant, almost 1970's colours in this range, and the blend of oranges, greens and blues which go together in an unexpected but lovely way.

I decided to turn this charm pack into a range of cushions.  For the first cushion I cut 16 of the squares into quarters, giving me 64 x 2.5 inch squares.  Then I simply stitched them together into an 8 x 8 square.  I backed the pieced square with a piece of wadding and some scrap fabric and quilted it diagonally using an orange/red variegated thread, and then made the back of the cushion with a piece of brown fabric and a zip closure.  I have a few Christmas cushions in the pipeline to make, and when I do I'll try and put together a tutorial for how I finish the backs of cushions with a zip - I have a really straightforward method which I saw demonstrated on TV once, it gives a lovely neat finish and I find holds together better than an envelope back.


For the second cushion I again took 16 squares and kind of half followed the method in this tutorial over at stitcherydickory dock to make the blocks you can see in the photo below.  I finished the cushion in the same way as the first one, except with a white fabric for the backing.


And here's the back.


The third cushion was made using some of the triangular offcuts from the second cushion, and another one of Amy's tutorials.  I'm really pleased with the effect, but think that it would be good to try making it with a darker fabric for the background, or quilting it a bit more heavily, so that the seam lines aren't as obvious.


If you're keeping count, you'll realise that I still have 10 charm squares left from my pack.  I've been planning on using those to make a small dresden panel for a cushion - I've never done a dresden before and am quite excited to give it a go, it's just got pushed fairly far down on my to do list with all the Christmas sewing that's going on!

Monday, 1 December 2014

Soaping up - The Handmade Soap Book

A couple of years ago I bought this book on making handmade soap, as I really fancied having a go.  For one reason and another, I never got around to actually having a go until a couple of weeks ago, and there are now three batches of soap curing in the garage.


It was easier than I expected to make the soap, and compared to the quickness and hurry which sometimes accompanies my sewing, it was incredibly chilled out and relaxed.  Because you have to let your fats and sodium hydroxide cool to the right temperature, wait for the soap to thicken and let it cure for four weeks, it's not a craft which you can rush.


So far, I have made honey, cinnamon and almond soap, grapefruit soap and pink lavender and lime soap.  They all smell fantastic and I can't wait for them to be ready to use!


The book was really good.  I found the instructions clear and readable, and the recipes easy to follow.  The pictures are enticing, and there is a lot of great information about different ingredients in the front of the book for if you want to come up with your own recipes.  However, the recipes given are so delicious that I think they will keep me going for a little while until I'm really confident I know what I'm doing.


In a previous life I was a chemist but I now work at a desk job, so there was something a bit fun about turning the kitchen into a mini chemistry lab for the evening.  But that's just the geek in me coming out!  There is no need to have any sort of experience in to do this; it's just important to follow the instructions carefully, and make sure to clean up properly afterwards.

It's a bit (very!) addictive, and I'm already planning my next batch: maybe cucumber soap, vanilla soap, or goat's milk and ylang-ylang.... hmm....

Linking up to Anything Goes Monday over at Stitch by Stitch.

Friday, 28 November 2014

Rainbow Quilt DONE!

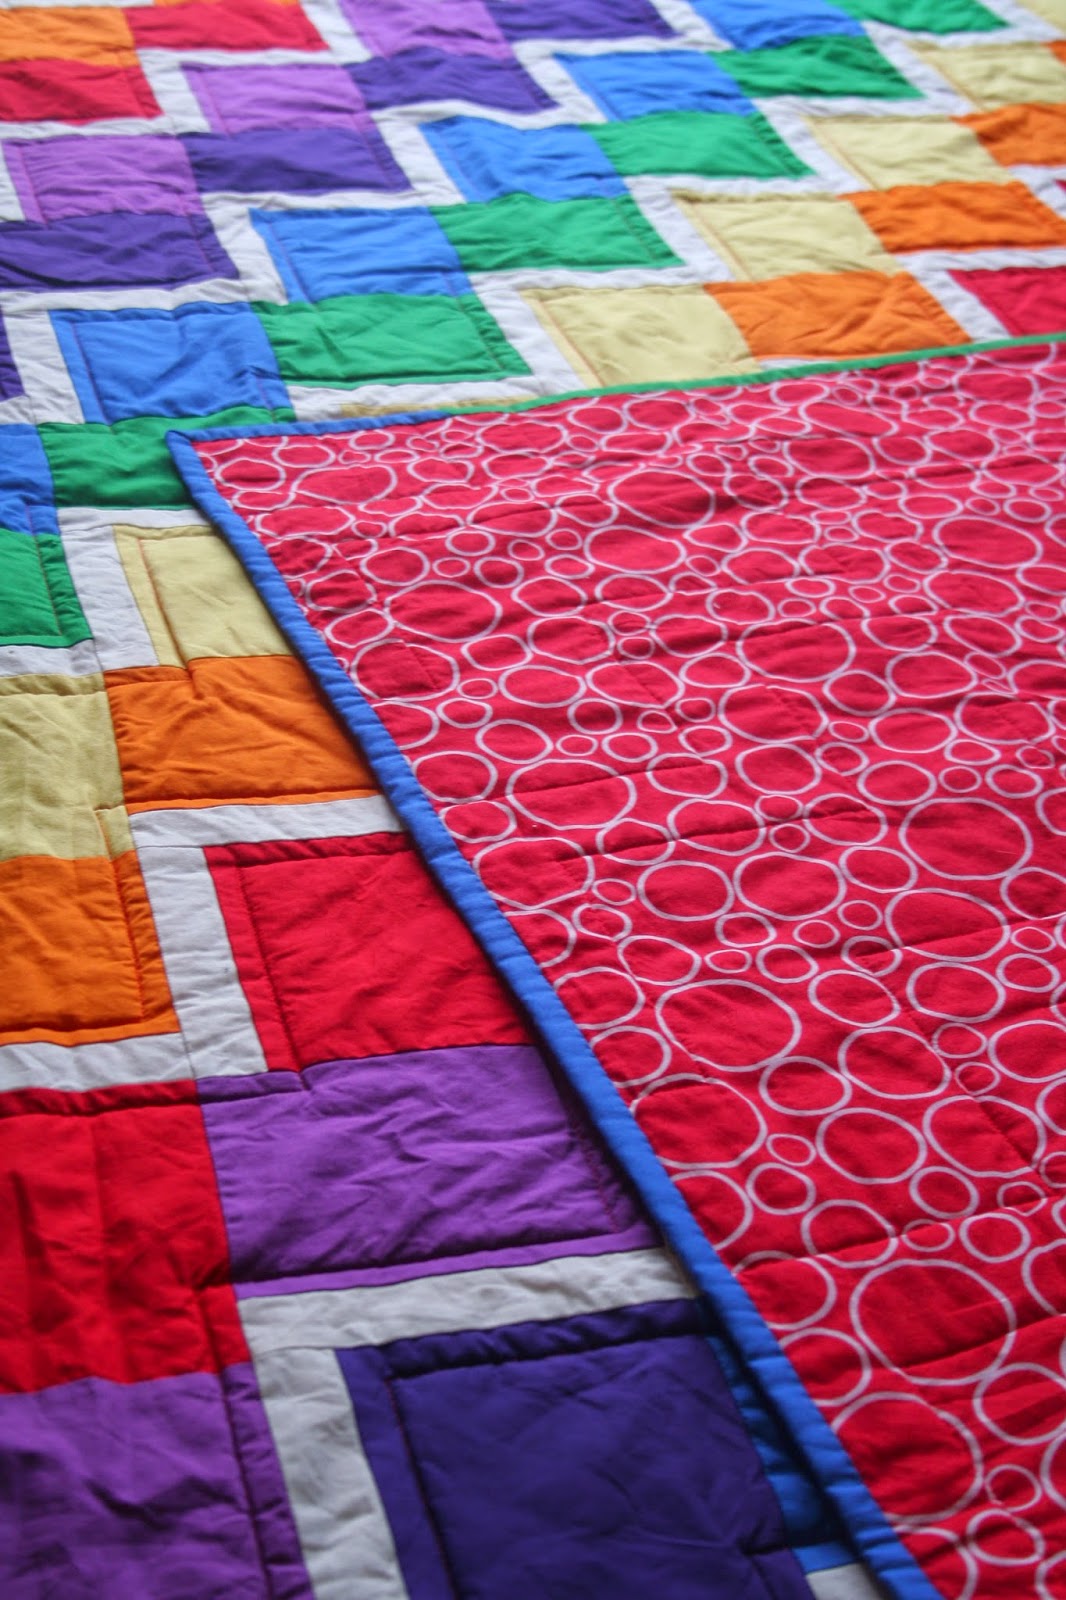
It's done it's done, my rainbow quilt is done!


I am so pleased with how this has turned out!  It's a bit wrinkly at the moment as I left it in the tumble dryer slightly long and the creases set, but they'll come out next time it gets washed (which, given it's my son's quilt I'm sure won't be long).


I quilted it in zig-zags, and have bound it in scraps of the green, blue, indigo and violet fabric.


This was going to be one of his Christmas presents, but I've already got him a few other presents and he's too little to really understand the idea of Christmas anyway, so I've decided to give it to him early.  I think a few games of hide and seek and a bit of tent building will be the order of the day!

Linking up to Crazymomquilts, Confessions of a Fabric AddictFreedom Fridays and TGIFF.