Showing posts with label zip. Show all posts

Monday, 15 December 2014

Tutorial - Zip Backs for Cushions

I always put zips in the backs of my cushions as I feel it finishes them off really neatly, and I don't get the gaping issue that sometimes happens with an envelope back.

I've got a really straightforward method for putting a zip into the backing fabric for your cushion so thought I would share it with you.  As with all things though, what's simple and fairly quick when I'm doing it, becomes a lot more confusing when I'm trying to explain it.  I've included lots of pictures which will hopefully help to make it clear, (although as I was making a white cushion back with white thread and a white zip it wasn't ideal) but if you have any queries then just ask.

What you need:

Your cushion front.
A piece of fabric for your cushion back, a bit bigger than your cushion front.
A long zip (I use about a 14" zip for a 16" square cushion).

1.  Measure your cushion front.  Add one inch to the measurement for one side, and three inches to the measurement for the other, and cut your backing fabric to that size, eg if you have a 16" x 16" cushion, cut your backing fabric to 17" x 19"; for an 18" x 18" cushion, cut 19" x 21" etc.

2.  Turn your fabric so that the "long" edge (ie the edge you added three inches to the measurement for) is vertical.  Fold approximately the top third of the fabric down, and iron in a crease.


3.  Take the flap you have just folded down, fold it back up about 1" from your first fold, and iron in a second crease, so it looks like the pictures below.  Fold the flap back down again, and your fabric should look like the photo above, but with a crease ironed in about 1" from the top.


4.  Sew about 2-3 inches (depending on your cushion and zip sizes) inwards from each edge along the crease you made in step 3.  The gap between the two lines of stitching should be a bit shorter than your zip.


5.  Cut all the way along the fold at the top of the fabric, just above your lines of stitching - this is along the crease you made in step 2.


6.  Iron the seams you have just sewn (and cut) open, but iron along the whole width of the fabric (including the part in the middle that wasn't sewn).  If you lay your fabric down the right way up, it should have  a slit running across, about a third of the way down from the top.


7.  Lay your zip, zip-pull side up, on the table.  Put your backing fabric right side up over the zip, so that the zip appears through the slit, and pin the zip in place (at least at one end).  Using the zip foot on your machine, you now need to sew a box around the slit, about 1/4"-1/8" away from the edge of the fabric, over the zip, locking it in place.  I tend to pin the zip at one end, and then just keep moving it into place (lining the centre of the zip up with the edge of the fabric) as I sew down one side of it.  When you come up against the zip-pull, you may need to stop and lift your sewing machine foot to slide the zip-pull out of the way.


Once I've gone down one side I turn, sew across the end of the zip, then turn and sew up the other side.  When going up the second side of the zip, I pull the fabric over the zip so that it overlaps with the fabric on the other side very slightly (as in the photo below) - this makes sure that the fabric on the two sides of the zip butts up against each other and makes the zip almost invisible.


And voila!  You have a backing for your cushion with a zip ready installed.  Open your zip at least halfway, pin the backing right sides together with your cushion top (it will be slightly too big) and sew round the edges of your cushion top.  Trim any excess backing fabric off, turn the cushion the right way round (through the zip) and insert your cushion pad.


The final step is, of course, to annoy everyone in your house by making large numbers of cushions, but I take no responsibility for that.

I hope you enjoy the tutorial, let me know if you have any issues!


Wednesday, 3 December 2014

Around the House 4 - Wren and Friends Cushions

I previously talked about my charm pack trial, having a go to see what it was possible to make with these packs of pre-cut squares.  For anyone who hasn't heard of them, a charm pack is a pack of usually about 42 x 5 inch squares, in a range of fabrics from the same fabric line (so they should go together well).  They are a good way to get a taster of a fabric line, and for around £10 a pop aren't too pricey either.

I posted before about the wall hanging I made with a PB & J by Basic Grey for Moda charm pack.  I also bought a wren and friends by Gina Martin for Moda charm pack.  I love the vibrant, almost 1970's colours in this range, and the blend of oranges, greens and blues which go together in an unexpected but lovely way.

I decided to turn this charm pack into a range of cushions.  For the first cushion I cut 16 of the squares into quarters, giving me 64 x 2.5 inch squares.  Then I simply stitched them together into an 8 x 8 square.  I backed the pieced square with a piece of wadding and some scrap fabric and quilted it diagonally using an orange/red variegated thread, and then made the back of the cushion with a piece of brown fabric and a zip closure.  I have a few Christmas cushions in the pipeline to make, and when I do I'll try and put together a tutorial for how I finish the backs of cushions with a zip - I have a really straightforward method which I saw demonstrated on TV once, it gives a lovely neat finish and I find holds together better than an envelope back.


For the second cushion I again took 16 squares and kind of half followed the method in this tutorial over at stitcherydickory dock to make the blocks you can see in the photo below.  I finished the cushion in the same way as the first one, except with a white fabric for the backing.


And here's the back.


The third cushion was made using some of the triangular offcuts from the second cushion, and another one of Amy's tutorials.  I'm really pleased with the effect, but think that it would be good to try making it with a darker fabric for the background, or quilting it a bit more heavily, so that the seam lines aren't as obvious.


If you're keeping count, you'll realise that I still have 10 charm squares left from my pack.  I've been planning on using those to make a small dresden panel for a cushion - I've never done a dresden before and am quite excited to give it a go, it's just got pushed fairly far down on my to do list with all the Christmas sewing that's going on!

Friday, 21 November 2014

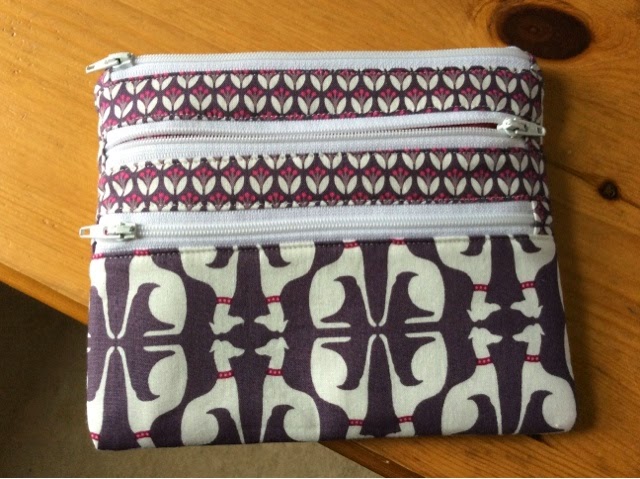
Triple zip purse finished!

I am so excited by this purse!

I love making purses, and my sister loves anything with lots of zips, so when I saw the tutorial for this over at A Quilter's Table I knew who I was making it for.  It would have been a Christmas present if I could have hung onto it for that long, but it was too fun so I popped it in the post to her right away.


When I was visiting my sister a few weeks ago we went into her local fabric shop and she fell in love with this gorgeous dog fabric, so I whipped back to get some, along with the purple accent fabric.  The pockets are lined in a pink polka dot fabric I had in my stash.


I found the tutorial in general really good and easy to understand.  I did end up doing the final steps slightly differently as I found the tutorial method a bit fiddly.  Also, because I was concerned that my zips hadn't all gone in totally in line with one another, I used a slightly bigger seam allowance on the side seams to ensure I caught everything.  As best I can explain, what I did was:
  • Once you have attached all of the zips, and it's just the sides of the pouch that need closing up, rather than turning the pouch through as described in the tutorial I OPENED THE TOP ZIP (it's a pain if you forget to do this - experience speaks), lifted up the biggest pocket, pressed the rest flat, and stitched from the bottom of the pouch upwards on both sides up to where it met the biggest pocket.  You are just stitching through the main body and the two smaller pockets, not through the biggest pocket.
  • I then stitched the two sides of the biggest pocket, leaving a gap for turning on one side.  You need to be careful to lay the pocket down how it will lie in the finished pouch, not just pull it out at right angles, and you won't be able to stitch right up to the top of the pocket.
  • Then, I stitched down from the top of the pouch, through all of the layers, until my stitching joined up with the main pocket stitching from the previous step.
  • It should now be possible to turn your pouch the right side out through the gap you left in the side of the biggest pocket and the open top zip (see why that was so important?!), iron it all out and stitch the hole in the pocket up.

Overall I'm really pleased with the result.  It has pulled a bit tight across the back because of the bulk of all of the zips on the front, but that doesn't seem to be affecting the way it works so I don't think it'll matter.  You may notice that the top zip is on the front of the pouch rather than directly across the top as well - that's just to do with me lining it up like that when sewing up the sides because I didn't look at the photos properly.

I'm linking this up with crazymomquilts finish it up Friday!