Showing posts with label cushion. Show all posts

Thursday, 1 January 2015

Happy New Year!

HAPPY NEW YEAR!!!  

Hope you've been enjoying celebrating :)  While I am not a fan of making new years resolutions as such, I do find it a good time of year to take stock of where I am up to in my crafting world.

To start the new year off, I've written a list of all my WIPs, all the projects I have fabric for but haven't started, and a wish list.  Some of the ones currently in progress have been in progress for an embarrassing length of time, we are talking a decade in at least one case, but hopefully I will get there eventually!  The aim for the next few months is to try and shrink this list, and attempt not to add to it too much faster than I'm working through it... 

In progress, with how long it's been in progress for (I'll add links over time as I blog about each project):

Long knitted cardigan (about 7 years)
Big cross stitch picture (about 10 years)
Teddy bear (about 15 years...)
Star quilt (since Sept 2014)
Purple squares quilt (since July 2014)
A cushion made with leftover flea market fancy scraps from my HST quilt (since July 2013)
Rainbow crochet blanket (since June 2014)

Have fabric for

The fourth Wren and Friends cushion
Flea market fancy fabric in red/yellow/grey, I think this will be a quilt, maybe a churn dash quilt...
Some russian doll fabric I'd love to make a bag out of.
Fishy wall hanging for my sister
A cushion to go with my sister's wedding quilt
T shirts for myself, hubby and my son

Dreaming of

Another heirloom cut chenille blanket
A sew together bag for myself
A weekend bag and washbag for hubby
Some more dressmaking

I'm also hoping to make plenty more soap!

Wish me luck...

Friday, 19 December 2014

Black and White Cushions Finished!

This is a very quick post today as pre-Christmas craziness is reaching new heights, just to say that my black and white charm square cushions are finished!  I'm so pleased with them, and they made their way to their new owner this week who is equally happy!  I finished the backs with zips, as described in this tutorial.  

Linking up to crazymomquilts, Confessions of a Fabric Addict and Modern Traditional Quilts.  I am also incredibly excited to say that my finish from last week, Emily's Quilt, is featured on Modern Traditional Quilts this week!

In lieu of more talking, here are many many photos :)


Monday, 15 December 2014

Tutorial - Zip Backs for Cushions

I always put zips in the backs of my cushions as I feel it finishes them off really neatly, and I don't get the gaping issue that sometimes happens with an envelope back.

I've got a really straightforward method for putting a zip into the backing fabric for your cushion so thought I would share it with you.  As with all things though, what's simple and fairly quick when I'm doing it, becomes a lot more confusing when I'm trying to explain it.  I've included lots of pictures which will hopefully help to make it clear, (although as I was making a white cushion back with white thread and a white zip it wasn't ideal) but if you have any queries then just ask.

What you need:

Your cushion front.
A piece of fabric for your cushion back, a bit bigger than your cushion front.
A long zip (I use about a 14" zip for a 16" square cushion).

1.  Measure your cushion front.  Add one inch to the measurement for one side, and three inches to the measurement for the other, and cut your backing fabric to that size, eg if you have a 16" x 16" cushion, cut your backing fabric to 17" x 19"; for an 18" x 18" cushion, cut 19" x 21" etc.

2.  Turn your fabric so that the "long" edge (ie the edge you added three inches to the measurement for) is vertical.  Fold approximately the top third of the fabric down, and iron in a crease.


3.  Take the flap you have just folded down, fold it back up about 1" from your first fold, and iron in a second crease, so it looks like the pictures below.  Fold the flap back down again, and your fabric should look like the photo above, but with a crease ironed in about 1" from the top.


4.  Sew about 2-3 inches (depending on your cushion and zip sizes) inwards from each edge along the crease you made in step 3.  The gap between the two lines of stitching should be a bit shorter than your zip.


5.  Cut all the way along the fold at the top of the fabric, just above your lines of stitching - this is along the crease you made in step 2.


6.  Iron the seams you have just sewn (and cut) open, but iron along the whole width of the fabric (including the part in the middle that wasn't sewn).  If you lay your fabric down the right way up, it should have  a slit running across, about a third of the way down from the top.


7.  Lay your zip, zip-pull side up, on the table.  Put your backing fabric right side up over the zip, so that the zip appears through the slit, and pin the zip in place (at least at one end).  Using the zip foot on your machine, you now need to sew a box around the slit, about 1/4"-1/8" away from the edge of the fabric, over the zip, locking it in place.  I tend to pin the zip at one end, and then just keep moving it into place (lining the centre of the zip up with the edge of the fabric) as I sew down one side of it.  When you come up against the zip-pull, you may need to stop and lift your sewing machine foot to slide the zip-pull out of the way.


Once I've gone down one side I turn, sew across the end of the zip, then turn and sew up the other side.  When going up the second side of the zip, I pull the fabric over the zip so that it overlaps with the fabric on the other side very slightly (as in the photo below) - this makes sure that the fabric on the two sides of the zip butts up against each other and makes the zip almost invisible.


And voila!  You have a backing for your cushion with a zip ready installed.  Open your zip at least halfway, pin the backing right sides together with your cushion top (it will be slightly too big) and sew round the edges of your cushion top.  Trim any excess backing fabric off, turn the cushion the right way round (through the zip) and insert your cushion pad.


The final step is, of course, to annoy everyone in your house by making large numbers of cushions, but I take no responsibility for that.

I hope you enjoy the tutorial, let me know if you have any issues!


Monday, 8 December 2014

WIP - Black and White Cushions!

I'm excited, this is my very first commissioned project.

My husband's colleague wants some black and white cushions for her lounge.  It's a fun one because black and white isn't a colour scheme that I'd ever have chosen for myself, so it really is something a bit different to play with.  Cushions are fun anyway, because they are finished so quickly in comparison to quilts, and are a great chance to try out new designs before embarking on a whole quilt.

Taking a leaf from my Wren and Friends cushions, I bought a charm pack in Shades of Black and White by Moda and a metre of moda bleached white fabric, and started planning.  I'm aiming to do three cushions, and got the pieces cut out at lunch time today.


And as the clothes ironing got done yesterday, sewing can start tonight!

Linking up to WIP Wednesday at Freshly Pieced.

Wednesday, 3 December 2014

Around the House 4 - Wren and Friends Cushions

I previously talked about my charm pack trial, having a go to see what it was possible to make with these packs of pre-cut squares.  For anyone who hasn't heard of them, a charm pack is a pack of usually about 42 x 5 inch squares, in a range of fabrics from the same fabric line (so they should go together well).  They are a good way to get a taster of a fabric line, and for around £10 a pop aren't too pricey either.

I posted before about the wall hanging I made with a PB & J by Basic Grey for Moda charm pack.  I also bought a wren and friends by Gina Martin for Moda charm pack.  I love the vibrant, almost 1970's colours in this range, and the blend of oranges, greens and blues which go together in an unexpected but lovely way.

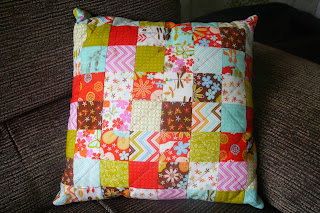
I decided to turn this charm pack into a range of cushions.  For the first cushion I cut 16 of the squares into quarters, giving me 64 x 2.5 inch squares.  Then I simply stitched them together into an 8 x 8 square.  I backed the pieced square with a piece of wadding and some scrap fabric and quilted it diagonally using an orange/red variegated thread, and then made the back of the cushion with a piece of brown fabric and a zip closure.  I have a few Christmas cushions in the pipeline to make, and when I do I'll try and put together a tutorial for how I finish the backs of cushions with a zip - I have a really straightforward method which I saw demonstrated on TV once, it gives a lovely neat finish and I find holds together better than an envelope back.


For the second cushion I again took 16 squares and kind of half followed the method in this tutorial over at stitcherydickory dock to make the blocks you can see in the photo below.  I finished the cushion in the same way as the first one, except with a white fabric for the backing.


And here's the back.


The third cushion was made using some of the triangular offcuts from the second cushion, and another one of Amy's tutorials.  I'm really pleased with the effect, but think that it would be good to try making it with a darker fabric for the background, or quilting it a bit more heavily, so that the seam lines aren't as obvious.


If you're keeping count, you'll realise that I still have 10 charm squares left from my pack.  I've been planning on using those to make a small dresden panel for a cushion - I've never done a dresden before and am quite excited to give it a go, it's just got pushed fairly far down on my to do list with all the Christmas sewing that's going on!